Get the complete film lab for $199 during the launch period. Regular price rises to $349 after.Get
--d:--h:--m:--s
Socials
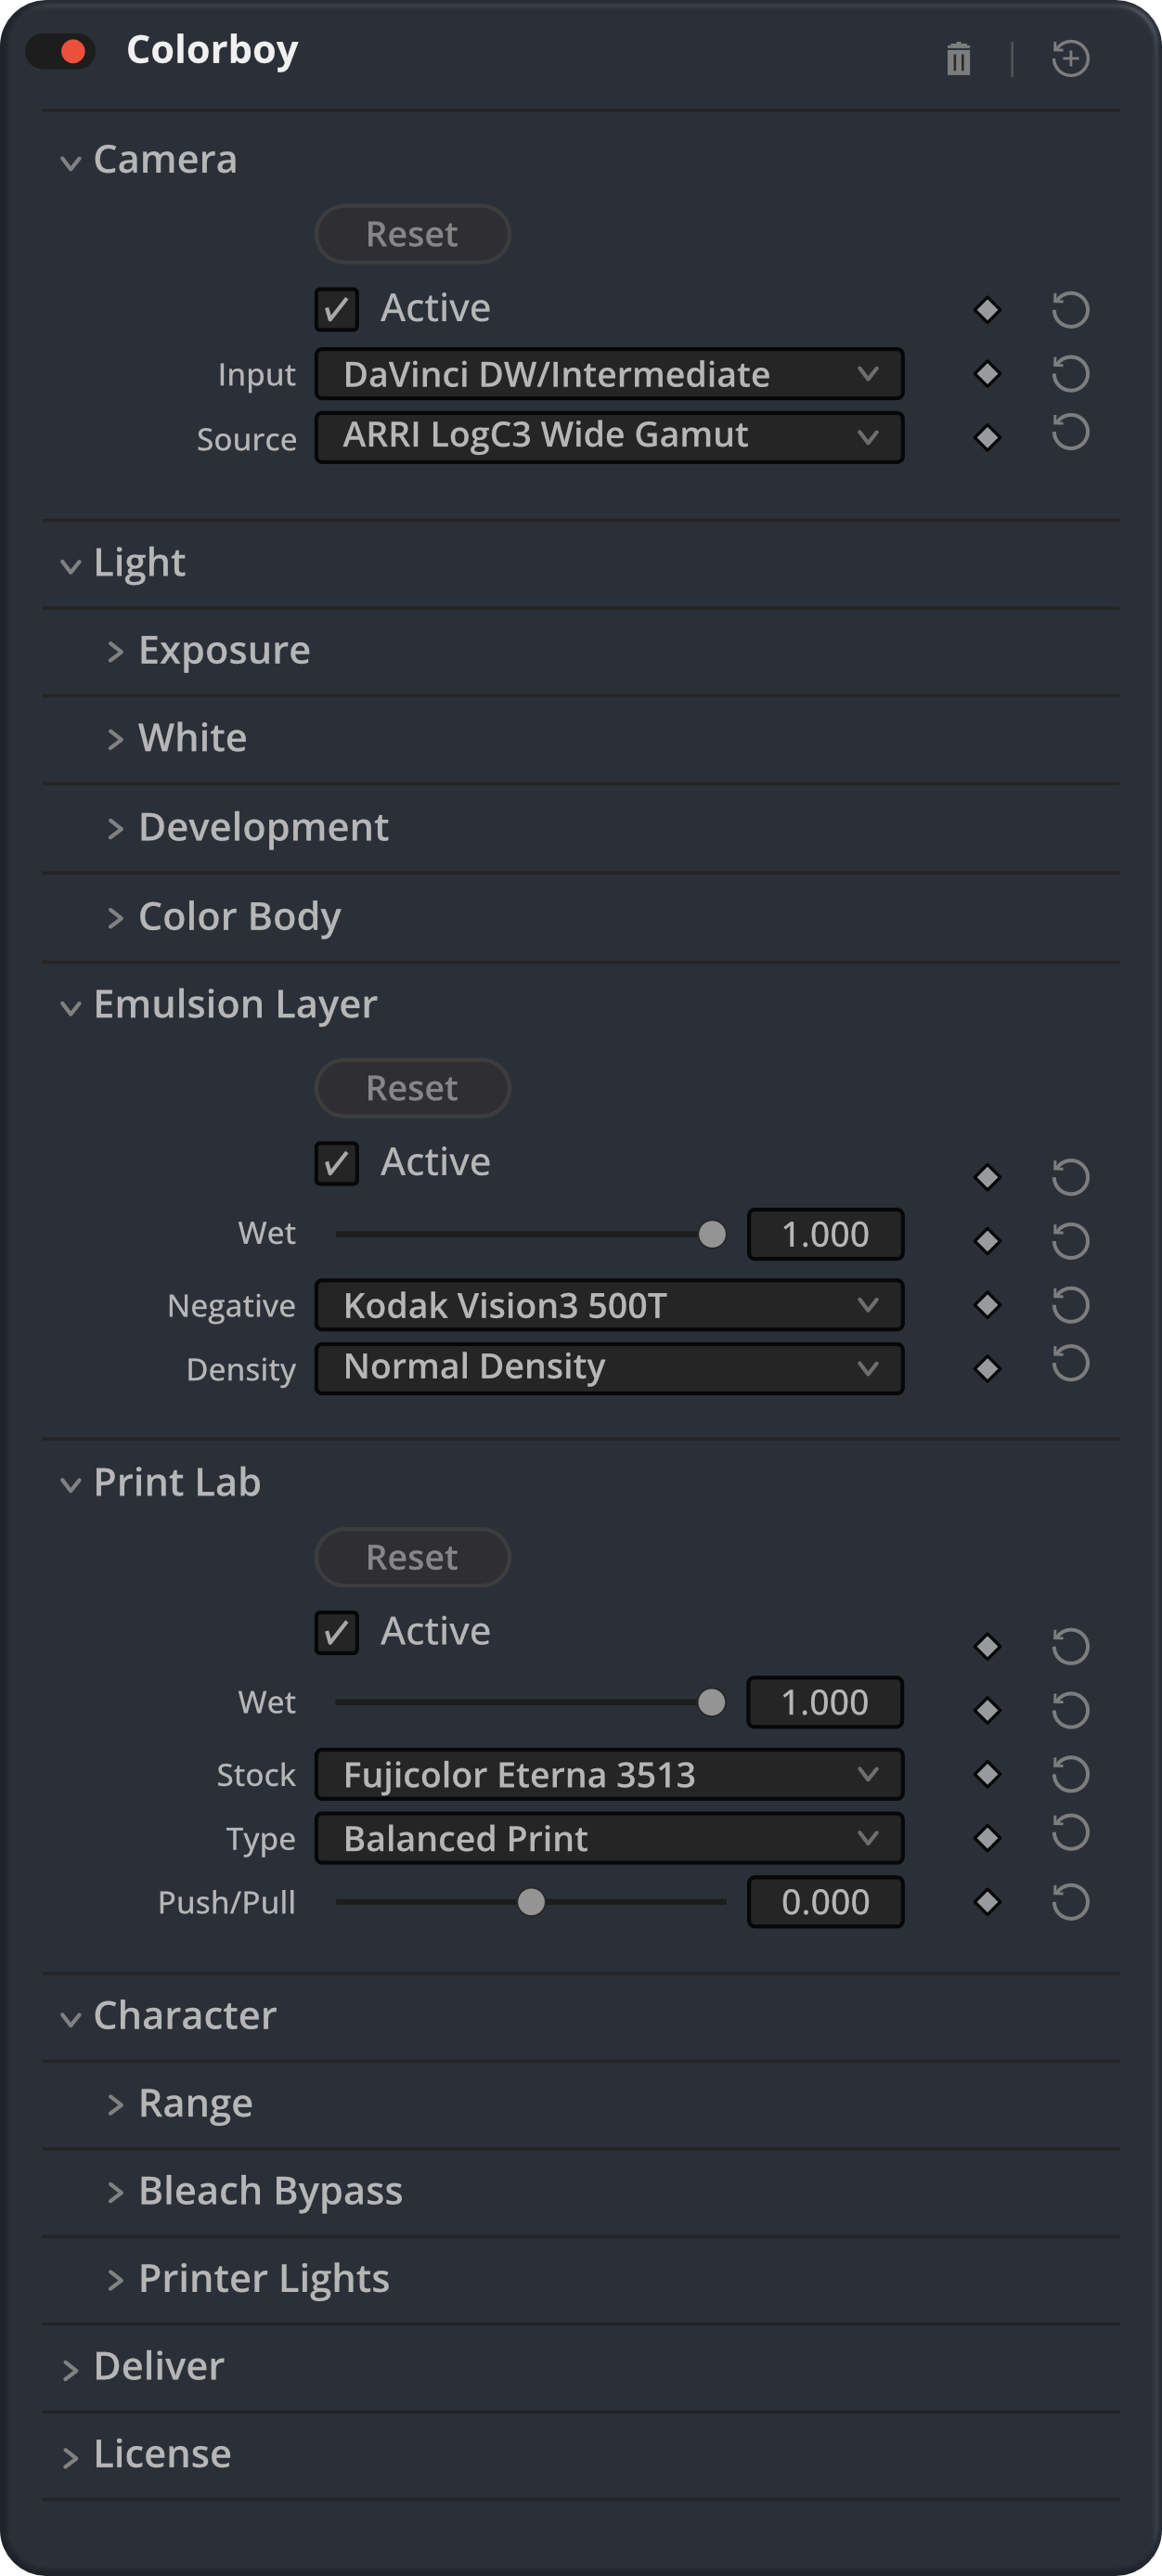
Colorboy Interface
Film color was never an effect. It was craft: light, emulsion, and the hands that shaped them. Colorboy brings that process into your timeline, stage by stage, so every decision you make carries intention. Follow the same path light takes through a film lab, and make each step yours.
01Camera
The color transform native to the sensor (CST — Color Space Transform). It converts the camera's log signal into a consistent working space, no matter which camera the footage came from. This is the entry point — everything downstream assumes the image already lives in this common space.
Controls
InputInput mode. Standard for DaVinci YRGB · Rec.709 (Scene). DaVinci Wide Gamut for DaVinci YRGB · DWG/Intermediate.
SourceCamera source. Select your camera and log profile to convert to Rec.709 — ARRI, RED, Sony, Blackmagic, Canon, Nikon, and more.
Color Management
Colorboy works in one of two color spaces, matching your DaVinci Resolve project setup. This choice comes first — everything else in Colorboy depends on it.
Standard — for timelines in Rec.709 (Scene), no color management. DaVinci WG/Intermediate — for timelines in DaVinci Wide Gamut, with color management active.
Match your Input selection to your actual Resolve project settings — this table shows the two supported recipes:
SettingStandardDaVinci WG/Intermediate
Color scienceDaVinci YRGBDaVinci YRGB
Separate color space and gammaOffOff
Timeline color spaceRec.709 (Scene)DaVinci WG/Intermediate
Output color spaceRec.709 Gamma 2.4Rec.709 Gamma 2.4
02Light
Exposure control, before the image "touches" the emulsion. It simulates how the amount of light reaching the frame affects the final result, ahead of the film's non-linear response. Four subsections — Exposure, White, Development, and Color Body — each with its own Blend for precise control.
Exposure
How much light reaches the emulsion, before anything else happens to it.
EnableEnables the Exposure section.
BlendExposure blend. Drag right to mix in the exposure-adjusted result.
ExposureDrag right to brighten, left to darken. +1.0 = one stop up.
White
The color temperature and tint of the light itself, set before development.
EnableEnables the Chromatic Balance section.
BlendChromatic blend. Drag right to mix in the white balance result.
Color TempDrag right to warm, left to cool.
TintDrag right to shift magenta, left to shift green.
Development
How the film's contrast curve responds around mid-gray — the chemical reaction that shapes shadows, mids, and highlights.
EnableEnables the Development section.
BlendDevelopment blend. Drag right to mix in the developed result.
Push/PullHarmonic contrast curve anchored to mid-gray. Drag right to push, left to pull.
PivotOffsets the mid-gray anchor point of the development curve.
ToeDrag right to lift shadows, left to crush them.
MidsDrag right to lift midtones, left to lower them.
ShoulderDrag right to open highlights, left to compress them.
Mid-Gray SpaceSelects the color space that defines the development curve anchor point — instead of using a fixed mid gray, the selector uses the official mid gray value of each logarithmic color space, the same value the camera manufacturer sets as the neutral exposure point.
Studio Standard0.43543.5 IRE
ARRI LogC30.39139.1 IRE
ARRI LogC40.27827.8 IRE
Apple Log0.49049.0 IRE
Blackmagic Gen50.38438.4 IRE
Canon Log 20.39839.8 IRE
Canon Log 30.34334.3 IRE
DaVinci Intermediate0.33633.6 IRE
Fuji F-Log0.45945.9 IRE
Fuji F-Log20.38438.4 IRE
Lumix V-Log0.42342.3 IRE
Nikon N-Log0.36336.3 IRE
RED Log3G100.22322.3 IRE
Sony S-Log30.41041.0 IRE
Color Body
The film's color response as the negative develops — saturation, density, and richness.
EnableEnables the Color Body section.
BlendColor Body blend. Drag right to mix in the color result.
ColorDrag right to saturate, left to desaturate.
VibrancyNaturally increases saturation in areas with low saturation.
DensityAdjusts color density.
RichnessDeeper, more intense colors.
03Emulsion Layer
The chemical heart of the process. This is where different film stocks' response to color and contrast is modeled — not a linear adjustment, but a distinct response per color layer (cyan, magenta, yellow), the way it physically happens in the chemistry of a real negative.
Controls
EnableEnables the Film Emulsion section.
BlendEmulsion blend. From 0% (Original) to 100% (Film).
NegativeSelects a film emulsion profile and its color response.
DensitySelects the film negative's density.
04Print Lab
Simulates the lab printing process — how the negative translates to positive as it passes through the print stock. This is where the negative becomes a positive, and your image starts to feel finished.
Controls
EnableEnables the Print Lab section.
BlendPrint blend. From 0% (Original) to 100% (Print).
StockSelects a photochemical print stock profile and its color response.
TypeSelects the print exposure density level.
Push/PullApplies development contrast in the print stage at half strength.
05Diffusion
New in Colorboy Pro v1.3
Simulates the soft glow of light spreading around bright areas, from a subtle mist to a dreamy bloom.
Controls
EnableEnables the Diffusion section.
ProcessSet to Scene to decode gamma before the glow is calculated (recommended), or Display to process directly in display space.
PresetMist is a soft airy veil, Soft is a gentle low-threshold glow, Cinematic is a wide halo on strong highlights, Dream is a heavy hazy glow.
BlendDiffusion blend. Drag right to mix in the diffusion result.
StrengthDrag right to increase the intensity of the glow.
SpreadDrag right to widen the radius of the glow.
ThresholdDrag left to let darker areas glow, right to limit the glow to the brightest highlights.
KneeDrag right to soften the transition between the areas that glow and the areas that do not.
VeilDrag right to add a wide, soft haze over the whole image.
HueSlightly shifts the tint of the glow.
TintDrag right to add a subtle color cast to the glow, using the Hue setting.
06Halation
New in Colorboy Pro v1.1
Simulates light scattering through the film base, creating a soft glow around bright highlights.
Controls
EnableEnables the Halation section.
ProcessSet to Scene to decode gamma before scattering (recommended), or Display to process directly in display space.
PresetSelect the film gate width used to scale the halation radius.
BlendHalation blend. Drag right to mix in the halation result.
StrengthDrag right to increase the intensity of the halation glow.
SpreadDrag right to widen the radius of the halation bounce.
FlourishSoftens the edges of the halation, giving bright lights that blooming, flourishing glow.
HueShifts the tint of the halation glow, from amber/orange to other tones.
SaturationDrag right to intensify the halation color, left toward gray.
Resolution
Softens image detail to simulate the lower resolving power of period-accurate emulsions.
EnableEnables the Resolution section.
RCAResolution Clarity Attenuator (RCA). Drag right to reduce image sharpness, simulating the softer resolving power of period-accurate emulsions.
07Grain
New in Colorboy Pro v1.3
Adds real 35mm film grain, applied on top of the final image.
Controls
EnableEnables the Grain section.
GrainSelects the film grain format.
AmountDrag right to increase the intensity of the grain.
RoughnessAt 0 the grain has its strongest micro-contrast; drag right to relax it toward the natural scanned texture.
SaturationDrag right to bring in the color of the scanned grain, left toward monochrome grain.
Distribution
Controls how much grain appears in shadows, midtones and highlights.
ShadowsAmount of grain in the darkest areas.
MidtonesAmount of grain in the middle tones.
HighlightsAmount of grain in the brightest areas.
08Character
The lab's final finish — how the tonal range behaves, how bleach bypass reacts, and how printer lights are adjusted before delivery. Three subsections — Range, Bleach Bypass, and Printer Lights.
Range (Lights)
Fine control over how deep blacks, shadows, and highlights roll off — the print's tonal range.
EnableEnables the Lights section.
BlendRange blend. Drag right to mix in the lights result.
Carbon PointDrag right to lift deep blacks, left to crush them.
Shadow ToeDrag right to lift shadows, left to darken them.
Light ShoulderDrag right to open upper midtones, left to compress them.
High Roll-OffDrag right to open highlights, left to compress them.
Bleach Bypass
A lab process that retains silver in the print, raising contrast and cutting saturation.
EnableEnables the Bleach Bypass effect.
BlendBleach blend. Drag right to mix in the bypass result.
Bleach AmountDrag right to retain more silver. Increases contrast and reduces saturation.
Printer Lights
The color timing applied at the printer — the final push of red, green, and blue before delivery.
EnableEnables the Printer Lights section.
BlendPrinter Lights blend. Drag right to mix in the printer-timed result.
Red - CyanDrag left to add red, right to add cyan.
Green - MagentaDrag left to add green, right to add magenta.
Blue - YellowDrag left to add blue, right to add yellow.
09Split Toning
New in Colorboy Pro v1.2
Apply independent color tints to shadows and highlights, with control over hue, reach, and balance.
Controls
EnableEnables the Split Toning section.
High HueSets the tint color applied to highlights.
High ReachDrag right to extend the highlight tint further into the midtones.
Shadow HueSets the tint color applied to shadows.
Shadow ReachDrag right to extend the shadow tint further into the midtones.
BalanceDrag right to shift the split point toward highlights, left toward shadows.
AmountDrag right to increase the strength of both tints.
10Acutance
New in Colorboy Pro v1.2
Sharpens fine detail and edge microcontrast without affecting color.
Controls
EnableEnables the Acutance section.
ProcessFine applies subtle luma-only sharpening; Contour increases that strength by 30%.
AmountDrag right to increase edge sharpening strength.
Edge MaskDrag right to limit sharpening to stronger edges, reducing the effect on flat areas.
Chroma SoftnessDrag right to smooth color noise without affecting luma detail.
11Deliver
The final output, ready for whatever delivery standard the colorist needs (Rec.709, P3, etc.) — the point where the entire photochemical simulation becomes the image the end client sees.
Controls
EnableEnables the Deliver section.
BlendDeliver blend. Drag right to mix in the converted output.
For colorists, cinematographers, and high-end productions demanding total control.
Ten film stocks and three print stocks, with all 11 sections active: Camera, Light, Emulsion, Print Lab, Character, Halation, Split Toning, Acutance, Diffusion, Grain and Deliver.
All nine stages in real time at 4K 24 FPS, powered by Metal on Apple Silicon.
Two activations: the studio and your personal Mac. License delivered by email.
Yours for good. Every update, today and tomorrow, included.
Colorboy LiteCore color. Essential tools.
For indie filmmakers. Everything you need to bring pure film color to your daily edits.
The New Color StandardCelluloid character. Digital precision.The New Color StandardCelluloid character. Digital precision.
The New Color StandardCelluloid character. Digital precision.The New Color StandardCelluloid character. Digital precision.
Colorboy: A color processor that reaches its full potential through precise user customization.
Colorboy: Emulates the behavior of film negatives through an eleven-stage pipeline, giving you an authentic technical foundation to develop your project's unique visual identity.